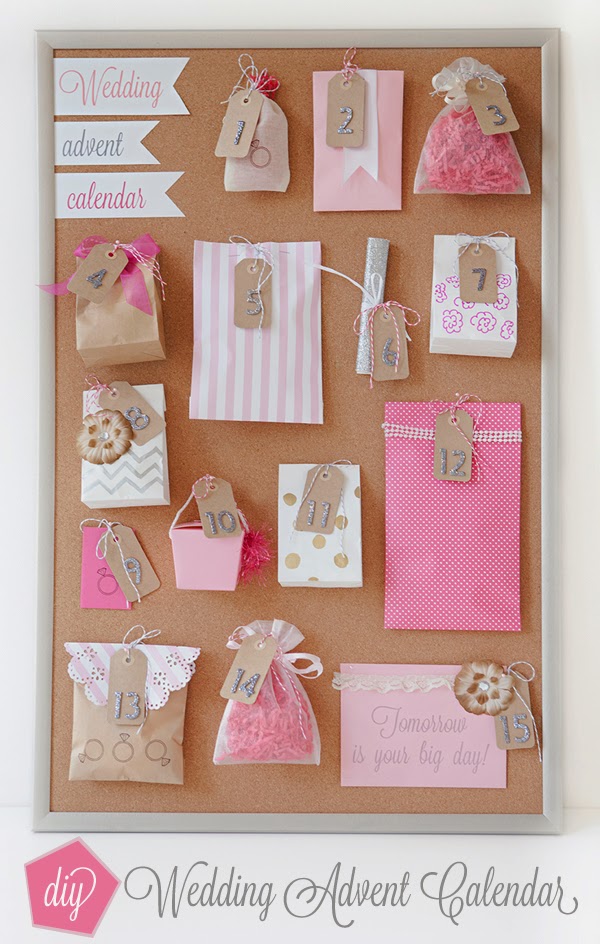
For me, planning my wedding was an absolute blast… and I enjoyed every second. However, those last few days before the big day are usually a tad bit stressful (or really stressful) no matter who you are and how well things have been planned. So today I’m sharing a project that’s obsession worthy; the Wedding Advent Calendar! It’s the absolute perfect way to brighten those last stressful days before your event; it’s a mini-celebration each and every day! Although as the bride you can’t make this for yourself – your bridesmaids will need to do it for you! So Pin, tag and share this darling idea with your besties so that they get the hint!
We tried to keep the supplies as simple (and as cost effective) as possible!
- large cork board (ours is 22″ x 36″ and was only $15)
- spray paint *optional
- cute little gift items
- fun wrapping supplies
- tags
- twine/ribbon
- sewing pins
- and cute number stickers!
Download, print onto cardstock and cut out our FREE design above. Or create your own!
We started by masking off our cork board…
..and then painted the wood frame with Krylon Satin ‘Nickel’ spray paint – two coats will do.
While the spray paint is drying, you can make the numbered tags! How many gifts you will give the bride is completely up to you… from 5 to 31 ~ it’s your choice!
Now here’s the thing about using stickers (versus stamps or printing from your computer) – many do not have multiple 1′s – which you need for 11, 12, 13, 14, 15. So when purchasing your stickers, make sure that within the font you will be able to cut other letters to resemble a “1″! This package of ‘thickers’ in ‘Wisecrack‘ was the perfect font – you’d never know we cut T’s and turned them into 1′s!
Cut twine or ribbon and add little bows to each tag.
So here’s the deal. As a bridesmaid, after you’ve spent $$$ on your dress, the shoes, the shower and the bachelorette party… I get it – the last thing you want is another expense. However, if everyone only buys one or two items – it could be $3 – $10 a person.
If you want to give this gift at the bridal shower, have the board and numbers prepped before hand, ask 10-15 people to bring one, small wrapped gift (letting them know of your wrapping color scheme will be helpful) and assemble board in secret during the shower. Then give to the bride at the very end of her unwrapping all her gifts… and tell her that she has more to unwrap but not until days before her wedding! This way all the presents and wrapping have been divided up among multiple people, so it’s not as much work. ***Also, you don’t have to do 15 gifts – do 5 or 10… or 30! Whatever you want!
Gift Ideas: undies, lipstick, body spray, mini-frame, lip balm, zit stick, tea bags, eye shadow, gum, hair bands, nail polish, wine opener, socks, candles, face mask, small gift cards… etc!
Using your favorite adhesive, apply the ‘wedding advent calendar’ design.
Gather all the gifts together…
..and start assembling! Lay them out on the board before you number them to make sure they all fit together and look adorable.
Using a sewing pin (with a large head on it) – pin right through the tag and present!
Cutesy Details: I simply embellished some of the plain gift bags with Sharpies (chevron, flower swirls and large gold polka dots) and made the two large envelopes out of scrapbooking paper (stripes and mini-polka dots) just by folding and securing with scrapbooking adhesive.
This heartfelt gift will make the days leading up to your besties wedding, even more special for her… so connect with the other bridesmaids to see how you gals can pull this off!
As with all our DIY tutorials, if you create one of our projects please send us a picture or a trackback – We Love Seeing Your Creativity! If you use Instagram or Twitter please use the hashtag #SomethingTurquoiseDIY. Happy Crafting!
Credits.
Photography: Studio 11 Weddings // DIY tutorial and downloads by: Jen | Something Turquoise // large cork board, paper/gift wrapping supplies, Krylon spray paint, tags, thickers, sewing pins : Michaels // little gifts were purchased at Target, Bath & Body Shop, and Ulta // nail polish: OPI – Love Angel Music Baby


ไม่มีความคิดเห็น:
แสดงความคิดเห็น